
I've had a productive weekend so far but it's not been crafting. Some family stuff to do and also a craft fair which went really well. So I find myself with time today.. and just typical.. the mojo has gone AWOL!
I'm still (supposed) to be in the process of spring cleaning, and that includes the craft room. So I had a wee rummage around and I found a card kit I bought years ago. I don't really do too well with kits. Whilst they look great, I find that I have no inspiration when I actually open them. This one contained lots of elements including pre-cut present shapes. Rather than waste them or the time I gave myself a shake and made a card type I haven't made for ages. I pop up box. Trust me, if you have never tried one of these then you should give it a go. They are the absolute easiest 3D cards to make. They are so straight forward. Once you get the hang of your first one you will be knocking them up in no time! A lot less work than all the colouring and elements that go into a 2D card.
Here's the basics.. and this can be re-sized to ANY size you want - you don't even need to use squares - you can make the sides any size. I went with squares for my card.
Start with a piece of A4 cardstock and trim it so it measures just under 30cm (the length it is anyway) by 14cm. Score it on the long side at 7cm, 14cm, 21cm and 28 cm. Then score on the short side at 7cm. This will give you 4 squares of 7cm x 7cm in length (with just under 2cm left to make the tab to connect it all), and 2 squares of 7cm in height.
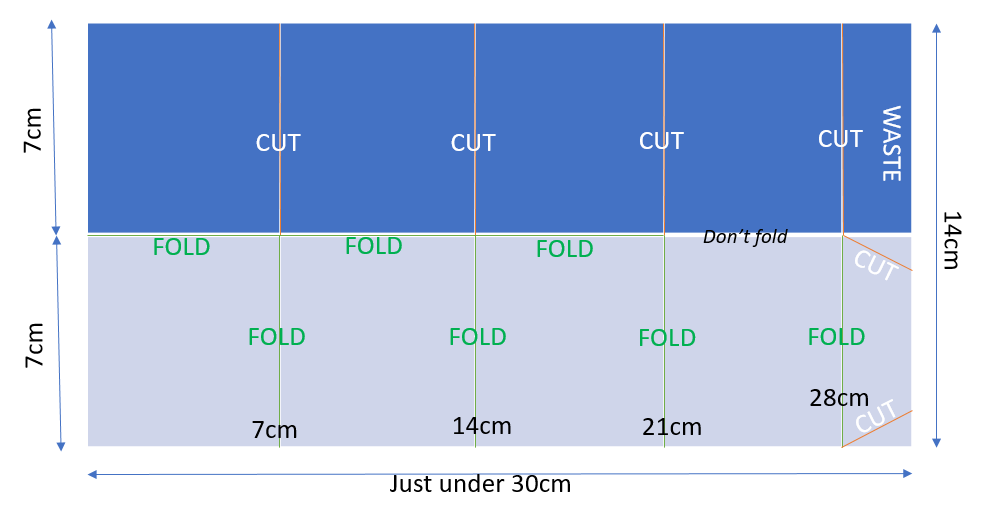
This give your the card base. You can then mat and layer your favourite papers and cardstock on the different sections. You can do this first before you assemble. The easiest way to assemble the base is to use some glue or DST on the little flap (on the bottom right above). Fold the card on the 14 cm score line and fold in the little flap at 28cm. Then fold it in half to adhere. When it's stuck you can then open it out to have your basic box shape.
There are then two or three little z fold tabs stuck in the middle of the box to stuck your embellishments to. These need to be the same width as the sides of the box.. in this case 7cm.
I used acetate to mount up the embellishments so they look to be exploding from the box.
Have fun!


No comments:
Post a Comment